Since I was a small boy, I had a knack for technology and science. For some reason, it was interesting to see people melt metal and fuse them together using a thin rod and electricity. During high school, I studied and learned the building process of welders through various sources. I also experimented with small transformers for a long time to get good knowledge about them. Finally, after high school, I managed some money and made it. So this is my homemade arc welder build guide for everyone. This is an interesting project and can be very useful for hobbyists.
An Arc/Stick welder is a device that uses an electrical power supply to create a hot arc. It uses a consumable electrode to melt and fuse the metals together. This homemade welder is a really cool project, and I highly encourage you to make one. This is an engineer’s and hobbyist’s tool that can create other tools and fix things. In this guide, I explain how to make a welder out of a microwave with diagrams, photos, and videos.
Most arc welders use a transformer to step down high voltage low current supply from the wall outlet of the house to low voltage and high current. The low current makes welding safe but suitable enough to create and maintain an arc. On the other hand, high amperage helps to create heat and melt the metal and electrode to fuse them. This is a short-circuit process. Shorting out very high voltage with very low amps won’t burn anything. But they will create a dangerous and deadly arc. We can see such high voltage arcs in tesla coils and substations. In the case of a stick welder, we just make a sustainable arc with low voltage and high amperage.
Background Knowledge of Welding Power Supply and MOT
For welding, you will need a good power supply. That is why we need big transformers. Arc welding machines found in the market have a single big transformer or electronic circuit. We can use them if you can find one of a suitable size. But, here we are using Microwave Oven Transformers (MOT) for our DIY arc welding machine due to a few critical reasons. The first reason is that MOTs are compact, the second reason is that their secondary winding is big, and the third is easy availability.
The big transformers can give the required high power output. Our goal is to get low voltage around 40 Volts but a very high amperage. The basic formula for power is (Watts= Voltage x Current). For an ideal transformer, (Input Power=Output Power). However, there are some losses in the winding, plates, eddy current, heat, etc. So we have to consider them as well.
The reduced voltage is enough to maintain a good arc. At the same time, high amperage is useful for creating heat and penetrating the metal. One might ask why only Microwave Oven Transformers (MOT). Actually, I have tried everything from TV and transformers of inverters too. But there is nothing like a good MOT welder. They have a big core, less primary winding, a big secondary window, and great power that is required for us. While building the welder, make sure nothing is connected to the mains, and there is a good measure for protection. Inside the oven, there are high-voltage capacitors, so make sure to short them first to discharge them.
Homemade Arc Welder Build Guide
Welders are very useful tools and they are a must-have if you have a garage or do your own work. Moreover, the homemade welder is a fun project and it can provide you satisfaction because working and making your own tools provides the next level of happiness. Therefore we are building a DIY arc welder which is very cheap and powerful too. This just needs very few things which include salvaged microwave oven transformers, wires, switches, PVC tape, clamp, electrode, and holder. Just follow the below-given steps and you can also have your own homemade welder.
1) Preparing the Transformers (MOT)
First, we need at least two MOTs to salvage. Find any old microwave oven at your disposal. You can find it in your local classified, scrap yard, and repair shop. Do ask some friends and people for help. In our country, most people don’t use microwave ovens, so it is hard to find. For the sake of science, I salvaged my own working oven. For another one, I searched for more than 2 years and found it in an electrical repair shop. It cost me Rs 700 or $7. I bargained many times for 6 months and then finally purchased it.
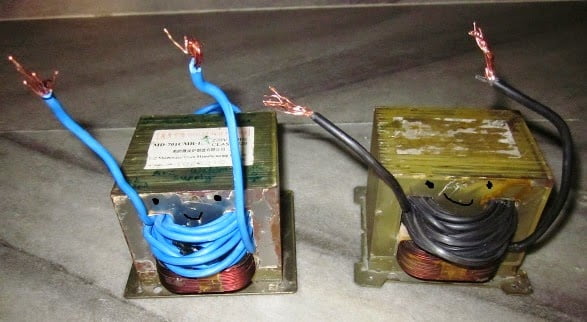
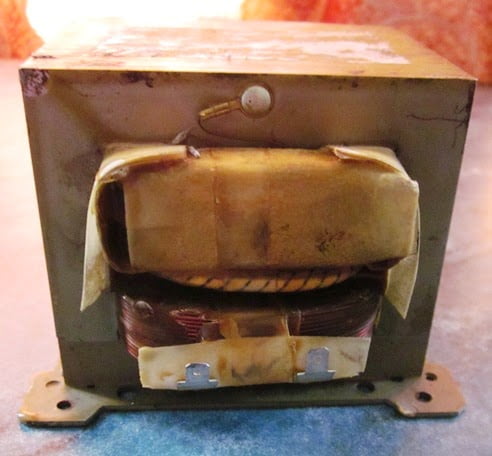
I chopped the secondary windings of both MOTs. You can break down the transformers completely by removing their I section from the E section. You can use a hacksaw or a grinder to cut the welded joints. I didn’t have any welding tool or Epoxy glue to stick them back. Therefore I chopped off the secondary coil using a chisel and a hammer. The secondary should be removed without damaging the primary. The filament winding and the shunt should also be knocked off. The shunts are two metal plates kept at the window of the transformer to maintain current or to control it. We are not going to need it because we need high amps.
Clean all the residue and lose secondary wires before processing forward. If you see any damage to the primary coil, fix it. Also, do a test of primary winding for continuity and leakage test on transformer body. If the varnish of copper wire is scraped, cover it with new varnish or other insulating material.
2) Rewiring and Connections
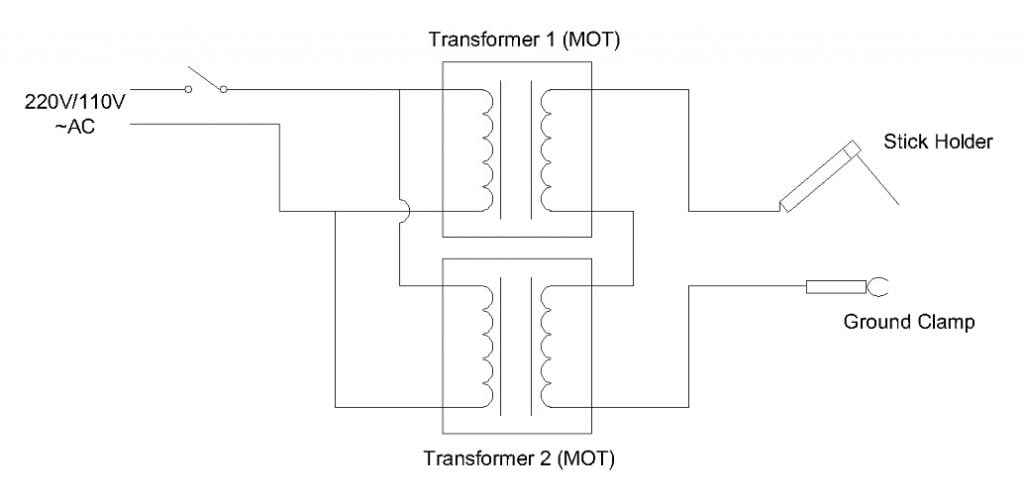
Now we should put secondary wires in the transformers. As we need fewer volts, we are going to install thick wires and have fewer turns. Lesser the turns higher, the amps, and fewer the voltages. We need an appropriate size of wire to fit in so as to get suitable current and volts. Many DIY builders use 12 gauge or 10 gauge copper wire. I am using stranded 14 gauge copper wire. It is also known as 7/22 wire, which means 7 stranded wire of 22 gauge. I installed the winding in both transformers and got 38 volts out, which is about right.
Be very careful while placing secondary winding. Don’t disturb or break the primary coils. Check your output voltages before finalizing the primary input. Install the secondary in series so that output volts will add up. I have 220V transformers and the output from walls or mains is also the same. My secondary output is 38 volts at 175 amps while short-circuiting. If the final output voltage is less than expected, it means MOTs are canceling each other. Just switch the primary terminals of anyone of the MOT to fix this.
Do cover every terminal and loose connection properly. Make the wire connections tight to prevent loose connections and sparks. Don’t touch any terminals with your bare hands. Moreover, don’t take both ends of the circuit at the same time. Use a clamp and suitable stick holder to start your welding.
3) Finishing and Finalizing
I also built a casing to make it compact and portable. I used some jumper cables to feed the stick holder. You can use any pliers to hold the stick, but a stick holder makes it easy to weld. I also used some old thick copper wires for the ground with a battery clamp. I bought 25 mm jumper wires that cost me $1.5/m. But it was good enough to handle a good amount of current.
While making case and wiring, make provision to take out the output from a single MOT as well. This can give you another option to use low-power devices. Some people use that low voltage output to make carbon rod metal melter. We have also made a small metal melter or spot welder using one MOT. Most importantly always be very careful while touching wires. Make sure the area is well-ventilated. Wear all protection and always use a mask and eye protection.
Stick Welding Guide For Beginners
In the previous section, we learned to build a home made welders but now we should also learn to weld. When I first made a welder, it was my first time welding. I have never actually welded anything. So I also watched a few videos, read a few articles, and got on the journey of how to arc weld for beginners. Welding is amazing, and it is a great skill to have. Therefore I want to share some information with everyone to help them learn to weld. I have written this article as an arc welding basics for beginners to help home and hobby welders
How Welding Process Works
The welding machine takes input power through wall outlets of the house or workplace. That means it could be 110V-120V or 220V-240V AC from the wall. The wall outlet has high voltage and fewer amps. But there is a tremendous amount of power (Wattage=Volts x Amps ). So be very careful while working on these things. In an emergency case, you can use car batteries to weld as well. Just put two or three 12-volt car batteries in series. Then use one terminal as an electrode holder and another to connect the ground clamp to the base metal. This is not a safe way but this is the emergency solution.
A regular welding machine converts the high voltage low current input to low voltage and high current output. The process may use a transformer or an electronic circuit. This makes it safe and suitable for welding purposes. The two outputs terminals are taken to create a short circuit. This creates a hot electrical arc to melt metal. One terminal is known as a stinger or electrode, and the other is ground.
The welding output voltage of our homemade welder is 38 volts. Our input is 220V AC from the wall outlet. Many experts prefer a 220V welder instead of 110V due to the good duty cycle. Another reason is the excellent built quality of transformers to handle 50 Hz electricity. So I advise people to make 220V welder even if they have a 110V wall outlet. You can use two sockets, which are 180 degrees out of phase, and put the primary of transformers in series. If you can’t do this, use 110v input for your transformer.
Knowing the Basics of Welding
To have a good weld, we must be careful about the size of the metal, electrode type, metal type, and settings. The welder operator should have good knowledge of electrodes and welding positions. At first always use heavy-duty gloves, masks, covers, and shoes. The arc of welding is very bright and hot, which can be hotter up to 2000o Celsius. UV Radiation is also emitted, and it is pretty harmful to give you a burn. So be very careful while working.
First, let us know about the electrodes. There are various types of electrodes available, and each has its specialties. Most of you are a hobbyist and don’t tend to be so much technical. Most of you might just do small and light fabrications. For those people, the 2.5mm E6013 electrode is the best choice. It is the most common rod used worldwide. It works on DC + or – and works on AC as well. The first two digits represent the tensile strength of the rod. 60 means 60 thousand PSI tensile strength.
E6013, E6010, and E6011 are other popular rods. These are also mostly used in welding pipes because they do good penetration. They can also be used for suitable open-root welding. E7014 is another rod that works on any current, and it is said to be highly efficient. The standard, best and stronger rod is E7018. Its low hydrogen property makes it suitable for welding, and the slag cover is also less than E6013. If you want to be better in this business and skill, go in-depth on this topic. Actually, good rod selection is very important. Knowing the electrode material and its use is very crucial.
Safety Tips
First of all, these are some important things to always remember while welding. Safety is a very important thing to learn from our arc welding guide.
1) Try not to weld Galvanized iron without a gas mask because the gas from zinc is carcinogenic.
2) Never ever touch two output leads at the same time.
3) Keep the welding area ventilated.
4) Be safe from any touch or connection with the primary.
5) Install a suitable fuse or circuit breaker for the primary, I prefer an MCB switch.
Starting the Arc and Controlling the Puddle
The major problem for starters is to strike an arc. I also had this problem. At first, the rods would just stick to metal, and the welder would make a “hmm…” sound and heat up. You will have to lose the rod at that moment to be safe.
People say that striking an arc is just like striking a match stick. Try to learn from some YouTube videos of other experts. After striking, learn to maintain it and balance it and control the puddle. The saying is that when the current is right, the weld sounds like “Bacon Fry”.
The most important stuff is to keep the arc as short as possible. It is easy to balance and control when the arc is short. Then slowly, try to push the puddle and slide away from the slag at the top because they can leave voids and puddles. If you have a welder with current control, then it is apparent that you should keep a low current for thin metals and a high one for thick ones. Just keep on practicing with scrap metals and maintain safety.
Reference:
- Build a Microwave Transformer Homemade Stick: Instructables
- How to Arc Weld: WikiHow
- The King of Random: YouTube
- Original Published: 2014/11/02


